Primary keywords: DIY natural lip balm, homemade lip balm, how to make lip balm at home, natural lip balm recipe, lip balm ingredients
Secondary keywords: beeswax lip balm, organic lip balm, moisturising lip balm recipe, shea butter lip balm, lip care at home
Store-bought lip balms are convenient — but if you have ever read the ingredient list on the back of a tube, you may have noticed a surprising number of synthetic waxes, artificial fragrances, and preservatives that have no particular business being on your lips. Making your own natural lip balm at home is simpler than most people expect, costs very little, and gives you complete control over what goes on your skin.
This guide covers everything you need to know — from understanding the key ingredients to a step-by-step recipe you can make in under 30 minutes.
Why Make Your Own Lip Balm?
Homemade lip balm has several genuine advantages over commercial products. First, you know exactly what is in it — every ingredient is one you have chosen and can pronounce. Second, natural formulations tend to be gentler on sensitive skin, free from synthetic fragrances that commonly cause reactions. Third, a batch of DIY natural lip balm costs a fraction of what premium natural brands charge, and once you have the base ingredients, you can make dozens of tubes for the same price as one shop-bought alternative.
There is also the satisfaction of making something yourself — and the ability to customise it entirely to your preferences.
Understanding the Key Ingredients
A good natural lip balm has three functional components: a wax to provide structure and staying power, an oil to deliver moisture and slip, and a butter to add richness and skin-conditioning properties. Here is what each one does and what to look for.
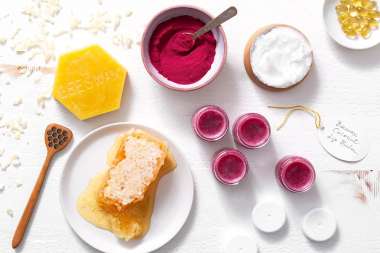
Beeswax is the most commonly used wax in homemade lip balm. It creates a protective barrier on the lips, locks in moisture, and gives the product its firm, solid consistency. It is naturally antibacterial and has a subtle honey scent. If you prefer a vegan formulation, carnauba wax or candelilla wax are effective plant-based alternatives, though they set slightly harder.
Carrier oils provide the base moisture in your lip balm. Sweet almond oil, jojoba oil, and coconut oil are all excellent choices. Sweet almond oil absorbs well and is rich in vitamin E. Jojoba oil closely mimics the skin’s natural sebum, making it ideal for dry or sensitive lips. Coconut oil is widely available, deeply moisturising, and adds a subtle natural scent.
Shea butter is the most popular butter for lip care formulations. It is rich in fatty acids and vitamins A and E, deeply nourishing, and non-comedogenic. Cocoa butter is a wonderful alternative — it sets slightly firmer and has a naturally warm, chocolatey aroma that many people find appealing.
Optional additions include vitamin E oil, which acts as a natural preservative and antioxidant, and essential oils for fragrance. Peppermint, vanilla, and lavender are popular choices. If you prefer a tinted lip balm, a small amount of beetroot powder or cosmetic-grade mica can be incorporated for a subtle natural colour.
DIY Natural Lip Balm Recipe
This recipe makes approximately 10 standard lip balm tubes or 4–5 small pots. The measurements can be scaled up easily once you are comfortable with the process.
You will need:
- 2 tablespoons beeswax pellets (or carnauba wax for a vegan version)
- 2 tablespoons shea butter
- 2 tablespoons sweet almond oil (or jojoba oil)
- 1 tablespoon coconut oil
- ½ teaspoon vitamin E oil
- 10–15 drops essential oil of your choice (optional)
- Lip balm tubes or small pots for storage
- A heatproof glass measuring jug and a small saucepan for a double boiler setup
Method:
Step 1 — Set up your double boiler. Fill a small saucepan with a few centimetres of water and bring it to a gentle simmer. Place your heatproof glass jug inside the saucepan, ensuring the base sits above the water level. This indirect heat prevents the ingredients from overheating or scorching.
Step 2 — Melt the wax. Add the beeswax pellets to the glass jug first, as they take the longest to melt. Stir occasionally and allow them to melt fully before proceeding.
Step 3 — Add the butter and oils. Once the wax is melted, add the shea butter, coconut oil, and sweet almond oil. Stir gently until everything is fully combined and the mixture is smooth and clear. Remove from heat.
Step 4 — Add vitamin E and fragrance. Allow the mixture to cool slightly for one to two minutes — you want it still liquid but no longer steaming. Add the vitamin E oil and any essential oils. Stir well to distribute evenly.
Step 5 — Pour and set. Working quickly before the mixture begins to solidify, pour it carefully into your lip balm tubes or pots. Fill each one slightly above the rim, as the product will contract slightly as it cools. Leave undisturbed at room temperature for at least one hour before capping.
Storage and Shelf Life
Store your finished lip balms away from direct sunlight and heat. A cool, dry drawer or cabinet is ideal. Made with vitamin E oil as a natural preservative, this formulation has a shelf life of approximately 12 months. If you notice any change in smell or texture before then, discard and make a fresh batch.
Avoid storing homemade lip balm in a car during summer — the heat will melt it, and while this will not damage the product once it re-solidifies, repeated melting and cooling can affect the texture over time.
Customisation Ideas
Once you have the base recipe down, there is significant room to experiment. Try replacing sweet almond oil with rosehip oil for added anti-ageing properties. Swap vanilla essential oil for a warming cinnamon-ginger blend in cooler months. Add a small amount of cocoa powder along with the fragrance for a subtle chocolate tint and scent. For a more intensive overnight treatment, reduce the wax slightly and increase the shea butter for a softer, richer consistency.